DO IT YOURSELF CAT FENCE - OR HOW TO OUTVINNY THE VINNY!
We wanted to provide a safe environment for our indoor cats to enjoy the outdoors. Our rescue cats are all former farm cats or semi-ferals and they continually meowed at the door to be let out. So we started with a 4ft foot high metal deer/rabbit fence, but found that the cats used various means to escape. They would scale a tree, get on a branch and jump outside the yard, or they climbed on gate posts and escape. That was not acceptable, so we needed to have a safer enclosure. Some of the cat fences and enclosures on the market were expensive, so we decided on the do it yourself option. After an online search we came upon Alley Cat Allies - Feral Cat Coalition website and their cat fence instructions. The link is from 1997 and the netting company does not seem to exist any more. We started with their instructions and modified them to make the fence construction easier and to date, just as safe and effective. We hope that you can also utilize our instructions for your project, but we encourage you to read their instructions first to get a general feel of how a cat fence should be set up if you don't have a fence or if you have an existing fence. They also have tips on how to get your cat used to the fence.
2020 REVISION
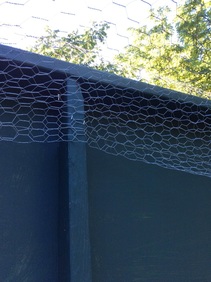
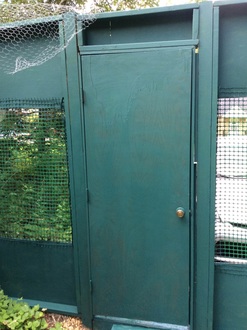
This revision was pretty substantial and we got rid of all the previous fencing. We bought 6 ft wire fencing and bent at the top (about 1 ft in), and put a baffle (screwed in by furring strips) on the wooden fence at about 5 ft height. The baffle is basically 2 ft wide wire fencing. We also installed a chainlink gate and put some netting on the bottom, as there was space to crawl underneath. We are hopeful that these improvements will work this summer.
This revision was pretty substantial and we got rid of all the previous fencing. We bought 6 ft wire fencing and bent at the top (about 1 ft in), and put a baffle (screwed in by furring strips) on the wooden fence at about 5 ft height. The baffle is basically 2 ft wide wire fencing. We also installed a chainlink gate and put some netting on the bottom, as there was space to crawl underneath. We are hopeful that these improvements will work this summer.


OLD FENCE DESIGNS Materials Needed and Modifications
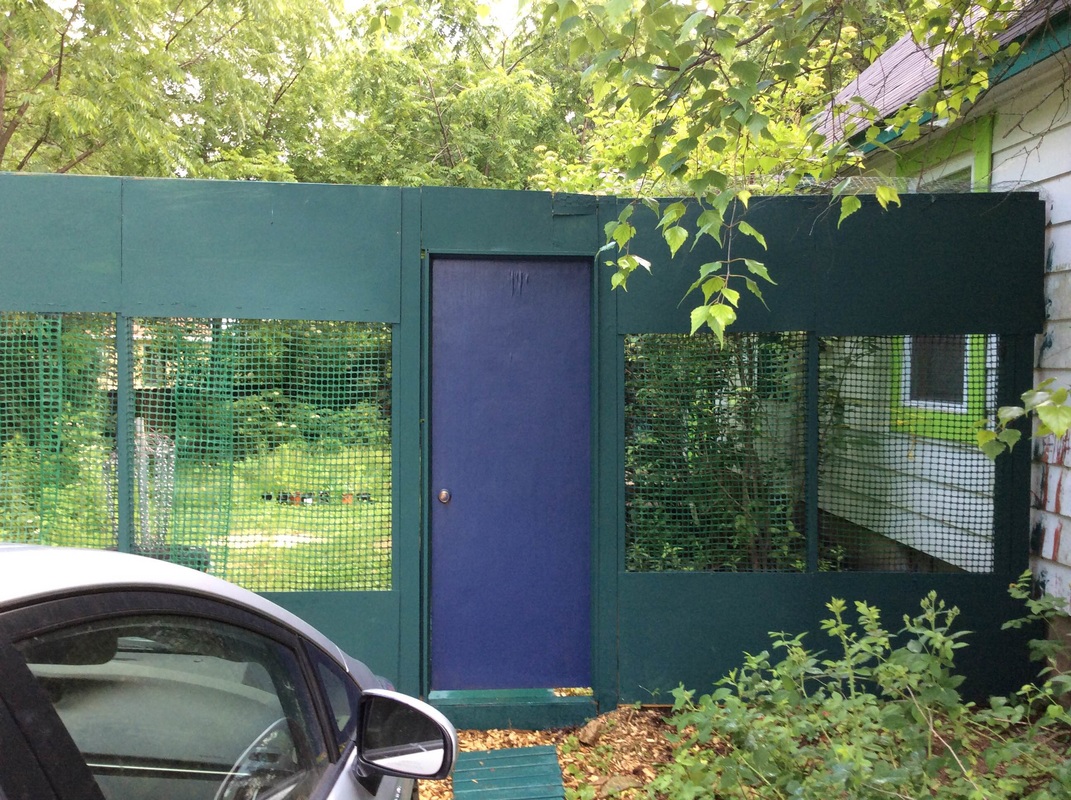
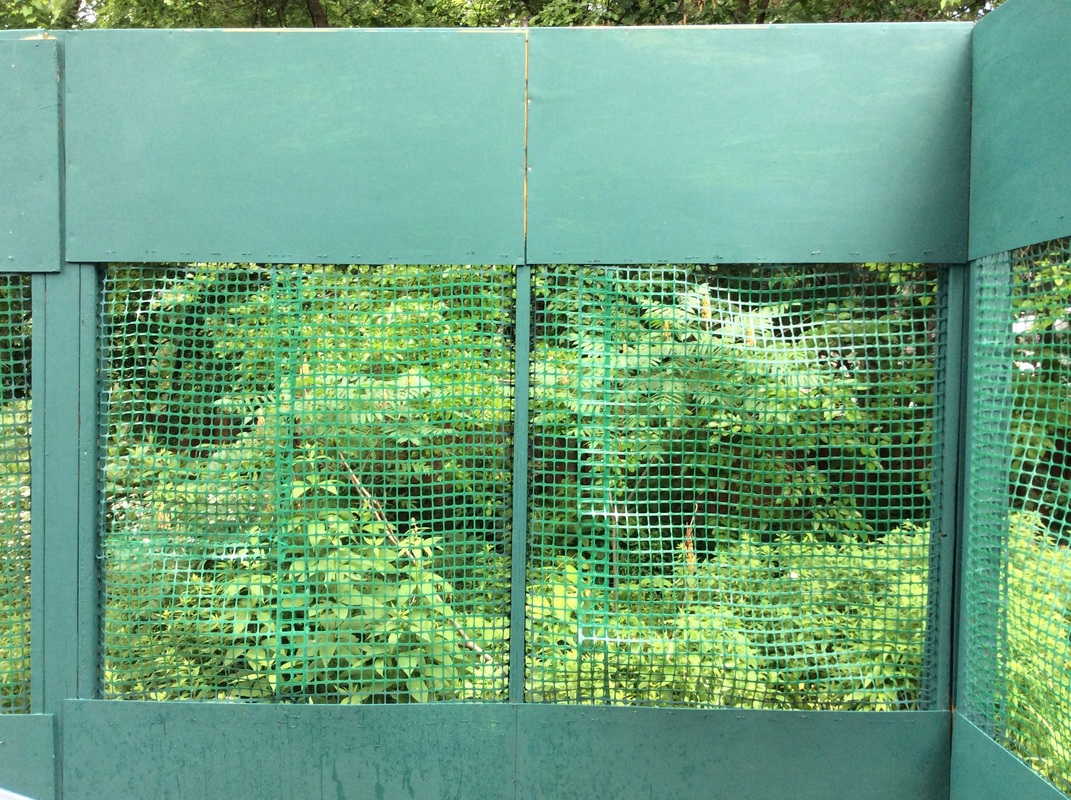
- 2016 REVISION - the gate area and most of the front wire fence was replaced by a wooden frame. Briefly, a framework of 2 by 4s was built (you can do an 8 ft frame square with a 2 by 4 stud at 4 ft. It is best to use L brackets to put the frame together. These frames are nailed to a post that is 10 ft high. Two feet of the post are buried into the ground. Plywood sections about 2 ft high by 4 ft wide are nailed to the wooden frame and then plastic netting is stapled to the plywood. We also replaced the gate with an actual door. For added protection, chicken wire can be stapled to the top so that if the cat manages to climb the netting, it will be deterred at the top.
- 2014 REVISION - The green tomato stakes are not that sturdy, so a better replacement is 1.5 PVC 45 degree elbow like this http://www.homedepot.com/p/NIBCO-1-1-2-in-PVC-DWV-45-Degree-Hub-x-Hub-Elbow-C4806HD112/100344098 that sits on the furring strip and about 1 ft 1.5 PVC pipe as an overhang.
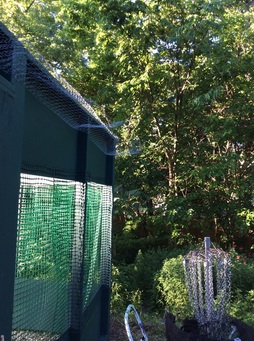
2012 REVISION - The furring strips work, but they can serve as scaffolding for Vinny to climb up, especially where he can just hop to the shed roof. So in those areas, we drilled holes in the furring strips about 7 ft up and put in the green tomato stakes. Then, we put in deer netting (3 ft or so) at 90 degrees to the fence. Netting attaches to the fence and green stakes with fishing line. This serves as a barrier that Vinny has not managed to circumvent.....yet! We also secured the netting by the gate by stapling about 2 ft of furring strip to the netting and gluing velcro straps on each furring strip. This way, we can more tightly close the netting that is loose by the gate. - 2011 REVISION - We found that the best support is 1 by 2 in furring strips about 6-8 ft in length. The netting can simply be stapled to the wood and the strip threaded thru the wire fence or tied to the fence with wire, twist ties or twine. It may be for people who do not have climbing vines, strong winds or storms that the stakes below would work fine, but through trial and error we found that the wood furring strips provide the best support.
- I realize that the US is the only country left which is not using the metric system. This fencing system is intended for everyone, but I dont want to put conversions after every number. So for everyone else, assume that 1 ft is about 30 cm and 1 inch is about 2.5 cm. I am not sure what the equivalent is of 16 gauge wire, but something to wrap around fencing.
- ORIGINAL SUPPORT RODS: Metal chainlink fence rods or garden poles, usually green hard plastic ones like the pictures below. Depending on the height of your existing fence, the stakes should be between 4-5 ft high. Measure the perimeter of your yard and plan for a pole approximately 10 ft. These poles run approximately $2-3 per pole. Our green garden poles bent under the weight of the snow and during a bad windstorm. So we bought metal rods that were by the chainlink fencing area in the hardware store. They are flat, sturdy and range from 3 to 5 ft.
- Netting. Use can use deer netting or garden netting (like this, but 4ft high). Again, depending on the height of your existing fence, the netting should be 4-5 ft high. Garden netting is about $10 for 25 ft and deer netting is about $60 for 400 feet. You can also get smaller weave deer netting that is flimsier, 100 ft x 7 ft for $14.
- Package of long twist ties - $1-2
White or black fishing line. A spool should do it. $1.50 - 16 gauge wire. Best without the insulation since it will bend and twist better. $5-10.
- Scissors to cut the netting and fishing line. Wire cutters for the wire
- Most of these supplies could be obtained at any hardware stores. We got all of ours at Home Depot. Total cost of the fence was about $150 and we had a bunch of stakes and netting left over. Note that you can experiment with other materials for the netting. We got what was on sale and looked similar to the material on the Feral Cat Website. Any flexible poly or vinyl netting with small squares (less than 1.5 inch square) should work.
Instructions if you have an existing chainlink or metal fence.
- We used 3.5-4 ft high netting and 5 ft high garden poles, since our existing metal fence is 4 ft high. You will have to tweak your measurements depending on the height of your existing fence. Total height of the fence + netting should be about 7-8 ft.
- The garden netting comes in 4 ft high sections, but the deer netting is 7 ft high and has to be cut in 3.5 ft sections. We found that to work comfortably with netting, it is best to have sections of no more than 20 ft in length.
- Trim any branches that will get in the way of the net. We left all our climbing vines on the fence and worked around them, weaving them around the fence and the net. Check your existing fence for any holes and patch them up. Look for any openings in the bottom and seal with dirt. To prevent small animals from coming into the yard, we put chicken wire around the bottom 2 ft of our metal fence. Shrubs next to the fence and that have small branches can be used for climbing. It is best to put netting along the fence and maybe trim the shrubs so that the cat does not use them as climbing aids.
- Affix the garden poles or metal rods to your existing fence approximately 10 ft apart. We simply weaved about a foot of it it through the chain links and then secured with 16 gauge wire tying the pole to the fence in 2 places. UPDATE. After a nasty windstorm, some of the green garden poles were bent and nearly cracked thru where they were affixed to the fence. This was mostly in sections where less than a foot of the pole was weaved thru the existing fence. It may be that after some storms, a pole or two would need to be replaced or metal rods need to be used. See above on using furring strips instead. We stained them to protect them against the elements.
- Put up the netting, securing it to the garden pole/metal rod and your existing fence with twist ties or the 16 gauge wire if you like. We left about 2-6 inches of netting overlapping the existing fence. Where you run out of netting and need to start a new section, leave a foot or two of overlap vertically.
- Finally, weave fishing line along each garden pole, further securing the netting to the pole. We found that the metal rods don't need the fishig line reinforcement, because they are flat and can be easily attached to the netting with wire. Weave the fishing line horizontally, where the netting overlaps your existing fence, so there are no gaps or holes for escape. Where the netting overlaps, put in another garden pole and wrap both sections around the pole with the fishing line. If you don't you want to insert another pole, thread both sections of netting with fishing line.
- If you see some sag in the netting, reinforce with and additional pole. The netting is designed to be flexible so that the cat cannot gain a paw hold on it.
Examples of the wooden frame and netting setup, chicken wire attachment
|
|
Examples of garden and deer mesh, green pole and metal rod and close ups of the fence


Example of fence support using furring strips


Example of barrier fencing at 90 degrees to the original fence


Example of the furring strips that tighten the netting by the gate


Instructions if you have a wooden privacy fence
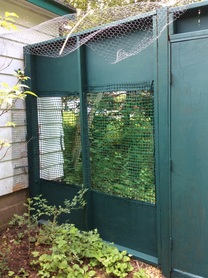
- We bought metal rabbit or garden fencing like this and nailed it to the wooden fence. Then we bent it, so that any cats climbing the fence would have a barrier of approximately 2 ft (see photo below)
- This has proven ineffective for one cat who would climb trees or our playhouse and jump on either the metal fencing on the privacy fence or the wooden fence itself. So we took 4 ft wooden strips about 1 " thick and used a staple gun to attach the deer netting to them (1, 8 ft section). Then we nailed the strips to the fence and stapled the netting edge to the fence to be absolutely safe.
Back Fence with metal barrier Back fence with netting barrier


Small trees fenced in Drain pipe on tree trunk Metal on gate


Using PVC pipe for a cat fence
One of our friends built their cat fence with PVC pipe. You can find various diameters of pipe at any hardware store. PIctures are below. Brenda gives the following instructions:
The grid itself is glued together with PVC cement which makes it quite rigid. It can then be screwed to a fence. I suggest triple coated deck screws or stainless steel, or fastened to the fence with pvc hangers which are screwed to the fence as well. The half circle hangers work well if face mounted to a fence. Mine is fastened to the top of the fence with "legs" that go down into the posts that hold the fence up, but if you are putting it on a wood fence you might want to make it taller so it can overlap the wood and still be tall enough and face mount it to the fence.
Small PVC pipe can be put over the furring strips to dissuade climbers. We did this with one of our posts, but Vinny still managed to grasp the netting. It may be possible to put the netting behind the PVC pipe to make it less desirable to climb. (see picture below)


   |
Using Conduit Pipes as Fence Supports
Alice has this type of fencing using conduit pipe - http://www.lowes.com/pd_72711-1792-101543_0__?productId=3129551 They have a tool you can slip over the pipe and bend so you can have an overhang (I guess you would call it that) as long as you want. The gadget you attach to the end is shown on the right side of the page. It has a screw on it . Put it on the end of the pipe and attach the deer netting. Then use cable ties down the length of the pipe to secure the netting. Attach to the fence with small U clamps , sold with the pipe. |
Additional Cat Securements, Catios, and Bird Friendly Practices
Catios and other cat enclosures
• You can build your own catio with fencing or kennel materials. As with the cat fence, there are DIY catio projects.
Here is an example http://wicatinfo.weebly.com/uploads/2/5/4/1/2541627/cat_enclosure_instructions.pdf and you can
do an online search for other designs
• Commercial catios – you can do an online search on catio. Here is an example of a commercial catio
• Less permanent are cat tents that you can take outdoors and let your cat hang out – Happy Habitat -
and other similar types of set up that you can search online. These tents are available at local pet stores.
• And finally, the cat stroller. Yes they exist!
• There are also leashes and harnesses to walk your cat or let it be on a tie out in the yard. Cats can wriggle out of
these and also can climb up a tree and get strangled. So the cat should always be overseen or at least be in an area
that does not have any trees, bushes or structures to climb.
Keeping birds safe from cats and having a bird friendly yard
• If your cat goes out, avoid letting it outside during early morning and dusk, when birds are more likely to forage. Also keep indoors during fall and spring migrations. Bells are completely ineffective. The two products below claim to be a deterrent. If you do try these products, always supervise the cat outdoors. It will not be an agile climber with these things on and they may get caught on a branch or a fence.
• Cat bib – www.catgoods.com I have bought it and then made my own prototypes from a thin mousepad and Velcro. It did deter my cats from catching birds, but they still caught small mammals (e.g. mice, chipmunks, voles).
• Bird Be Safe Cat collar - http://www.birdsbesafe.com/ This is a bright collar that the cat wears. A friend tried it and it did not work on her cat, but that cat was an experienced huntress. Your results may be different.
• One great thing you can do for the birds is to decrease the amount of lawn, eliminate lawn services which are toxic to birds and insects, and replace grass with native plants. Here are a few guides for WI
http://wildones.org/land/wibirdpl.html and http://www.plantnative.org/rpl-mimnwi.htm Invasive plant guides are here
http://dnr.wi.gov/topic/Invasives/ and http://www.ipaw.org/. We planted natives and have not had grass in our yard for
20 years and we have an abundance of birds, bees, insects, and small mammals.
- If you have a wooden gate, reinforce with some sheet metal, so that the cat cannot climb it. Turn the sheet metal away, so that no one will get cut (see photo below).
- If your cat is a tree climber, buy about 4-5 ft of corrugated plastic drain pipe and cut lengthwise. The standard diameters are 3, 4 and 6 in and the pipes come in 10 ft lengths and run about $3.50. It depends on the diameter of the tree. We had to make 2 cuts in the pipe, since the plastic could not bend around the tree. We made only one cut in the middle, so that the pipe wraps securely around the tree and is help on. Secure the pipe pieces with duct tape. Make sure your pipe is longer than the body of the cat, because the cat can stretch himself past the flashing and scamper up the tree. Another alternative is to use a squirrel guard. but those are pricey. Put some 4 ft high rabbit fencing around the smaller trees. It is impactical to wrap them in the pipes.
- No cat fence is a 100% safe, so be sure that your cat is either microchipped or is wearing a collar with an ID tag. If you don't have an existing fence, you can try putting in a 4-5 ft high metal rabbit/garden fence described above. You have to buy metal costs and attach the fence to them. Total cost about $200, which is cheaper than chainlink. Check your fence for holes due to wear and tear and patch them up with wire or fencing. Cats have all the time in the world to find escape routes and flaws. If your cat is still outsmarting your fence, you can try a catio or a commercial cat fence. There are many cat fence and catio options that you can google. For example Purrfect Fence for a fence and Catio Spaces for a catio. The Oscillot system is a cat proof baffle on top that can attach to your existing fence.
Catios and other cat enclosures
• You can build your own catio with fencing or kennel materials. As with the cat fence, there are DIY catio projects.
Here is an example http://wicatinfo.weebly.com/uploads/2/5/4/1/2541627/cat_enclosure_instructions.pdf and you can
do an online search for other designs
• Commercial catios – you can do an online search on catio. Here is an example of a commercial catio
• Less permanent are cat tents that you can take outdoors and let your cat hang out – Happy Habitat -
and other similar types of set up that you can search online. These tents are available at local pet stores.
• And finally, the cat stroller. Yes they exist!
• There are also leashes and harnesses to walk your cat or let it be on a tie out in the yard. Cats can wriggle out of
these and also can climb up a tree and get strangled. So the cat should always be overseen or at least be in an area
that does not have any trees, bushes or structures to climb.
Keeping birds safe from cats and having a bird friendly yard
• If your cat goes out, avoid letting it outside during early morning and dusk, when birds are more likely to forage. Also keep indoors during fall and spring migrations. Bells are completely ineffective. The two products below claim to be a deterrent. If you do try these products, always supervise the cat outdoors. It will not be an agile climber with these things on and they may get caught on a branch or a fence.
• Cat bib – www.catgoods.com I have bought it and then made my own prototypes from a thin mousepad and Velcro. It did deter my cats from catching birds, but they still caught small mammals (e.g. mice, chipmunks, voles).
• Bird Be Safe Cat collar - http://www.birdsbesafe.com/ This is a bright collar that the cat wears. A friend tried it and it did not work on her cat, but that cat was an experienced huntress. Your results may be different.
• One great thing you can do for the birds is to decrease the amount of lawn, eliminate lawn services which are toxic to birds and insects, and replace grass with native plants. Here are a few guides for WI
http://wildones.org/land/wibirdpl.html and http://www.plantnative.org/rpl-mimnwi.htm Invasive plant guides are here
http://dnr.wi.gov/topic/Invasives/ and http://www.ipaw.org/. We planted natives and have not had grass in our yard for
20 years and we have an abundance of birds, bees, insects, and small mammals.
Questions or Suggestions
If you have any questions or suggestions, please email us at [email protected] This cat fence is a work in progress (due to Vinny figuring out how to escape) and we will update the website with improvements. You can see pictures of our cats out in our yard on the website. We also realize that for some neighborhoods, putting up such a cat fence is against regulations. Work with your neighborhood or city to convince them that a free roaming cat is a hazard to itself, birds and can be a nuisance to others. There are people out there who are extremely cruel to cats and will not hesitate to take a free roaming cat for their evil purposes. Your cat is safest in its own backyard. Thanks!
